Audio Filters EXPLAINED (Low Pass, High Pass, Band Pass etc) 2022
Audio filters are an incredibly important part of music production and audio mixing. When used correctly, they can add clarity and space to your final mix.
Filters allow you to shape the frequency response of a sound, so that certain frequency ranges can be amplified or reduced. For example, using audio filters you can boost the low-end, “bass” response of a sound, or boost the high-end, “treble” frequencies.
In music production, audio filters are an essential part of the mixing process so it’s important to understand how to use them effectively. Audio filters can be used in many different ways, such as adding high-end clarity and “brightness” to a sound or cutting any unwanted low-end noise.
But how we we actually add an audio filter to a sound?

Adding Audio Filters using EQ
Audio filters can be shaped using an EQ plugin inside your DAW. An EQ (equalization) plugin allows you to shape the frequency response of a sound using filters.
EQ plugins come in many different shapes and sizes. Some are very simple and rely on a specific sets of knobs, which is usually to emulate analog, vintage EQ hardware (above left image). Other plugins are much more complex and detailed, allowing you to finetune the EQ response using a graphic visualizer (above right image).
Any major DAW comes with a stock EQ plugin to get you started, but there are also many incredibly powerful, versatile plugins out there on the market.
Using an EQ plugin, you can shape the frequency response in almost any way imaginable. However, there are several common types of audio filter that you can apply instantly to any sound.
Audio Filter Types
There are several audio filter types that are found in any EQ plugin, as well as VST synthesizers, effect plugins and more. These main filter types are incredibly common so it’s important you get familiar with the basics.
Low-Pass Filter
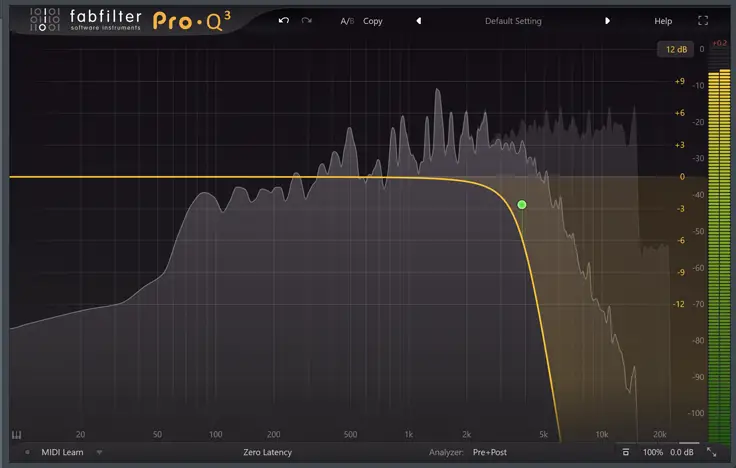
A low-pass filter essentially passes, or “lets through”, any frequency below a certain cutoff point. Above the frequency cutoff point, the sound is progressively attenuated. In other words, any low-end, bass frequencies are kept and the higher frequencies (above the chosen cutoff point) are removed.
This filter type is useful for removing any high-end noise or “hiss” from a bass-y sound such as a bass guitar or an ambient pad.
High-Pass Filter
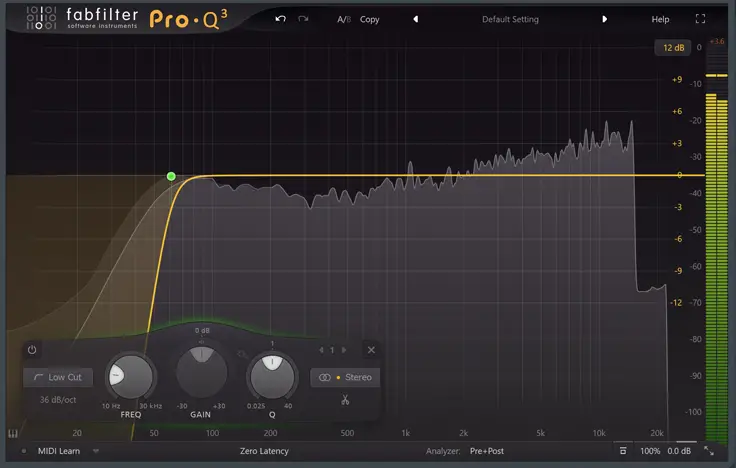
A high-pass filter is essentially the exact opposite of a low-pass filter. A high-pass filter lets through any frequency above a certain cutoff point. Below the frequency cutoff point, the sound is progressively attenuated. This allows you to retain high-end parts of the sound while removing low-end bass frequencies.
High pass filters are especially useful for vocals and other live recordings, as is allows you to easily remove any unnecessary rumble, AC noise and other low-end audio artefacts.
Band-Pass Filter
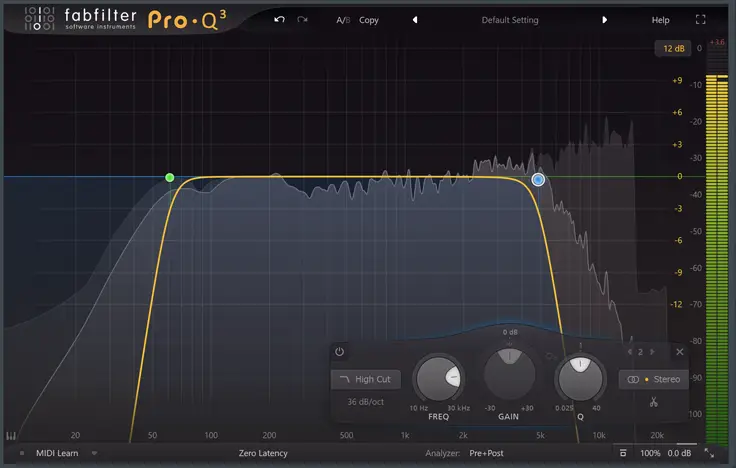
A band-pass filter passes frequencies between two specified cutoff frequencies, while attenuating frequencies outside the range. This is similar to adding a low-pass and a high-pass filter at the same time.
On the other hand, a band-reject filter does the opposite: attenuates frequencies between the two specified cutoff frequencies, while passing any outside the ‘reject’ range.
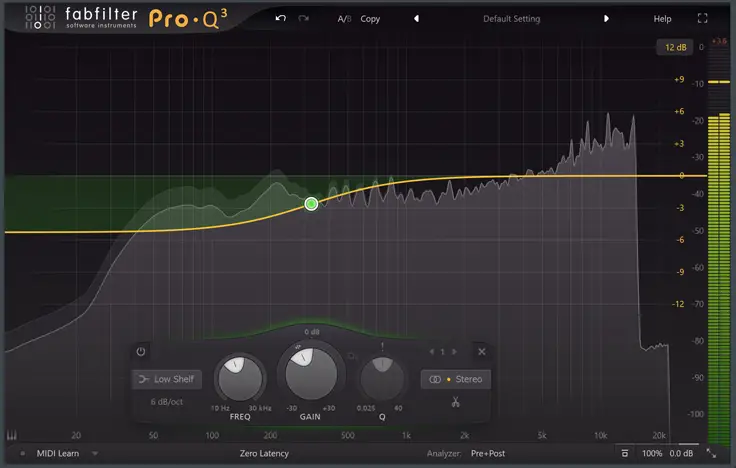
Shelf Filter
Shelf filters are useful if a standard low or high-pass filter seems a little too drastic. Shelf filters add a flat shelf so that all frequencies after the cutoff point are reduced by the same amount.
This is useful if you want to reduce the bass while still retaining some of the low-end frequency information.
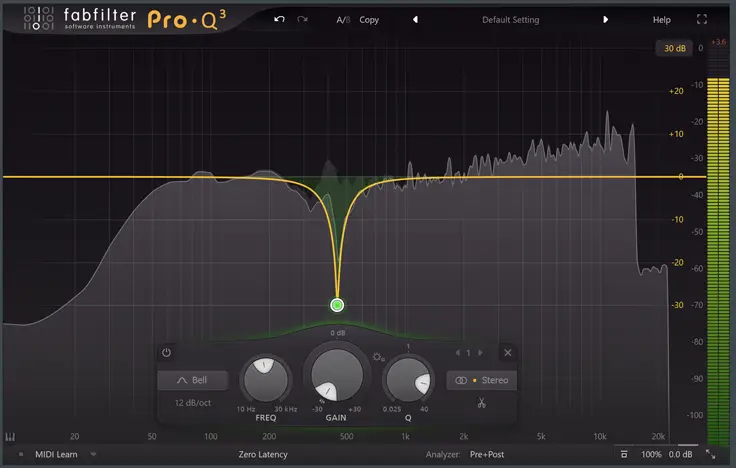
Notch Filter
Notch Filters are essentially the same as band-reject filters. This filter type can be used to pinpoint and remove any unwanted resonant frequencies.
To locate and remove an annoying frequency, first create a steep, narrow frequency peak.
Then sweep the peak along the frequency range, until the sharp, resonating frequency becomes significantly louder.
Once you’ve located the troublesome frequency, simply switch the filter to a notch-filter (above). This will cut the unwanted frequency, and will often improve overall tone of the sound.
The Essential Filter Parameters
The filter types above can be finetuned using a few basic equalization parameters. These parameters can be found on any EQ plugin, so it’s important you wrap your head around them.
Cutoff /Frequency
The is easily the most important control when it comes to equalization. It essentially sets the frequency point around which the filter will be applied. Low frequency ranges (20Hz – 200Hz) affect the lower, bass-y elements of a sound, whereas higher frequencies (2000Hz – 20,000kHz) affects the higher, treble ranges of the sound.

Resonance / Q
The Resonance parameter (also called the Q value) can completely change the tone of the EQ curve. More specifically, it defines the emphasis of the frequencies around the cutoff point.
For example, a high Q value (above) can create resonance and a steep peak around the cut-off frequency (so be careful!)
Slope
The Slope parameter determines the “steepness” of the audio filter curve. This is especially useful when adding low-pass or high-pass filters.
For example, a high-pass filter with a gentle slope will remove less low-end frequencies, resulting in a smoother, less drastic reduction. Whereas a steep curve will abruptly cut any frequencies below the cutoff frequency.
Audio Filters in Mixing
Audio filters are crucial part of the mixing process, and if used correctly can breathe life into an otherwise dull, thin-sounding track.
If you’re a music production beginner, it’s important you get to grips with the fundamentals of audio filters in music. EQ / audio filters will become one of your most commonly used mixing tools, so it’s important you get your head around the basics.
If you’re interested in learning some EQ tips and tricks for beginners, why not check out some of our guides below:
• 5 EQ Tips for Beginners to TRANSFORM Your Mixes (2022)
• The 8 Best EQ VST Plugins on the Market (2022)
• 5 Biggest Mixing Mistakes and How to Fix Them (2022 Music Mixing Tips)
• Top 10 Mixing Tips that will TRANSFORM your Final Track

